

Surfing has always been a thrilling water sport, but the emergence of electric hydrofoil surfboards is quickly pushing the experience to new heights. Electric foils, or E Foils, have been gaining immense popularity in the surfing world. But, as with many things, there’s enormous satisfaction in riding something you made yourself.
The easiest way to build your own DIY E Foil is by buying a pre-made kit that you can assemble. These kits usually come with instructions that are relatively easy to follow if you have the necessary tools and time. Building one without a kit is possible, but it will take more planning and effort.
The exact process will depend on various factors, such as if you’re using a kit (which is recommended) or doing it from scratch (if you’re very adventurous). It will also depend on which kit you use, but we will also guide you through that aspect. Let’s dive into the step-by-step process to build your own DIY E Foil!
Everything You Need To Know About DIY E Foil Kits And Building An Electric Surfboard
You likely won’t have much success building a DIY E Foil if you don’t understand what an E Foil is. Let’s start with the basic principles and work our way up from there.
What Is An E Foil, And Why Is It Gaining Popularity?
E Foiling emerged as a variation of the standard hydrofoil, which is a surfboard with a mast and sail “foil.” Foiling gained popularity in the early 2000s because it was a completely different surfing experience.
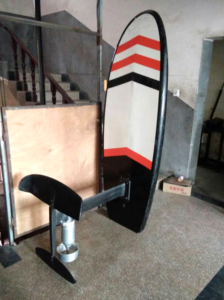
An E Foil is an electric hydrofoil surfboard that utilizes an electric motor and a hydrofoil wing to lift the board out of the water, allowing for a smooth and almost levitating ride.
This innovative technology has gained popularity due to its unique riding experience, combining the thrill of surfing with the feeling of flying. E Foils enable riders to effortlessly glide above the water, reaching impressive speeds and exploring new dimensions of surfing. It almost feels as if you’re flying above the water’s surface, which offers a new and exciting type of thrill.
Some surfers will always look down on different types of surfing, but anyone who wants to experience surfing differently will love E Foiling!
How Can You Build Your Own E Foil?
Building your own E Foil requires some technical skills and attention to detail, but with the proper guidance, it is perfectly achievable.
Here is a simple step-by-step guide to help you through the process:
Step 1: Research And Planning
The first thing you must decide during this phase is whether to do it from scratch or use a DIY E Foil Kit. Kits make things easier – you have all the components and can simply assemble them following a guide. If that’s your preference, many of the steps in this list will be unnecessary. However, some users prefer to do it the long way and make everything from scratch.
Once you’ve chosen your option, you should familiarize yourself with the components and design of an E Foil. It helps when you understand what it consists of and where everything goes.
Then you should determine the specifications you desire for your electric surfboard and gather information and resources from online tutorials, forums, and DIY communities (more on that later).
Step 2: Gather Materials And Tools
Obtain the necessary tools and supplies, such as a surfboard blank, fiberglass cloth, epoxy resin, hydrofoil components, batteries, and an electric motor kit. Of course, most of the equipment will be included when you buy a DIY E Foil Kit, but you will need to get most of the tools yourself.
Also, ensure you have the right safety gear, including goggles, gloves, and a respirator. Some components may be toxic, so take all the necessary precautions.
Step 3: Shaping The Board
Use a surfboard blank to shape the board according to your desired specifications if you’re not using a pre-made board. Then you can apply fiberglass cloth and epoxy resin to reinforce and protect the board.
Step 4: Installing The Hydrofoil
Carefully install the hydrofoil components, including the mast, wing, and fuselage, following the manufacturer’s instructions. It’s vital to ensure proper alignment and to secure the attachment to the board properly. You don’t want it to break off while you’re riding.
Step 5: Installing The Electric Motor Kit
Install the electric motor kit according to the provided instructions. Each motor is different, so carefully check the user manual or manufacturer’s website. Then connect the motor to the battery and controller. Double-check the wiring, then waterproof it properly.
Step 6: Testing And Adjusting
Perform a thorough dry run to check all of the components and connections. Test the board in controlled conditions to ensure its stability and performance. Make any necessary adjustments to optimize the weight, balance, and performance of the E Foil.
What Are The Best DIY E Foil Kits On The Market?
If you want to buy an E Foil kit, there are many reputable choices out there. You should get advice from experienced E Foilers as they can guide you based on your skill level. But, here are a few popular options.
Greenlight Surf Supply LF Series
Greenlight Surf Supply specializes in various surf kits, including the LF series designed explicitly for E Foiling. You may have to buy the electric motor separately, but the supplier makes a few excellent recommendations.
You can buy the LF Series from Greenlight Surf Supply’s online store.
VeFoil
VeFoil sells custom-developed pre-made E Foils, but there are also some kits to choose from. The company specializes in experimenting with new techniques and styles to create the best E Foil possible.
You can get VeFoil kits from the VeFoil website.
Maytech E Foil Kit
The Maytech E Foil kit is designed and manufactured in China but has an excellent reputation. It’s affordable and easy to assemble, but all the parts are well-manufactured.
You can get the Maytech kit from Alibaba.
Materials Required For Building An E Foil
If you want to build an E Foil from scratch, you will need various materials. These include:
- A surfboard blank or foam core
- Fiberglass cloth
- Epoxy resin
- Hydrofoil components (mast, wing, fuselage – these are usually a kit that you buy complete)
- Electric motor kit
- Batteries (lithium-ion or similar, but they must be waterproof)
- Controller and wiring
- Waterproofing materials (such as marine-grade sealant)
- Finishing materials (sandpaper, paint, clear coat)
You will also require the following tools:
- Shaping tools such as a planer, sanding block, and surform (surface forming tool)
- Utility knife
- Epoxy mixing containers and stir sticks
- Brush or roller for applying the epoxy resin
- Screwdrivers and wrenches for assembly
- Soldering iron and heat shrink tubing for the wiring
- Safety gear such as gloves, goggles, and a respirator
Ensure that you have all the necessary materials and tools before starting your project since you don’t want any unnecessary delays.
Tips And Tricks For Building An E Foil
Experts have a few valuable tricks that can help you while building your E Foil:
- Selecting the board: Choose a surfboard blank that suits your riding style and experience level. Consider factors like length, width, and volume to ensure stability and control while riding the E Foil. If you’re an absolute beginner, opt for a surfboard that’s rated for beginners.
- Weight and balance: The correct weight distribution is crucial for optimal performance. Balance the components evenly along the board, then check the balance frequently and make adjustments as necessary to achieve proper buoyancy and stability.
- Waterproofing: Ensure that all electrical connections are adequately waterproofed to protect the components from water damage. Use marine-grade sealant and adhesive heat shrink tubing to create watertight seals.
- Seek expert advice: Join online forums and communities dedicated to DIY E Foil building. Engage with experienced builders and enthusiasts who can provide guidance, troubleshoot issues, and share valuable insights. This will save you time and effort in the long run.
- Wear protective gear when working with epoxy resin and other chemicals, including goggles, gloves, and respirators. Follow manufacturer instructions for safe handling and storage of materials.
How To Install An E Foil Motor On Your DIY Surfboard
Installing an E Foil motor kit involves several steps, much of which will depend on the motor manufacturer’s instructions. The process basically consists of these steps:
- Carefully follow the manufacturer’s instructions provided with the motor kit. Your safety is at stake, so this is definitely a “read the manual first” scenario.
- Prepare the board by creating an opening for the motor and battery compartment, ensuring a secure fit. It’s good to talk to some professionals about this to avoid mounting the motor in a spot that will cause balance issues.
- Mount the motor in the designated area using the brackets provided.
- Connect the motor to the battery and controller, following the wiring diagram provided with the kit.
- Secure all electrical connections and use waterproofing materials to protect them from moisture.
- Test the motor and controller in a safe environment to ensure proper functioning before proceeding.
It’s vital to follow the specific instructions provided by the manufacturer of your chosen motor kit, as installation processes may vary.
DIY E Foil Forums And Communities
There are many online communities where passionate DIY E Foil builders come together to discuss their hobbies and sport. These communities are excellent places to get help and advice. Some of the most popular ones are:
E-Surfer Forum
The E-Surfer forum is a friendly, enthusiastic community where you can ask questions and assist others.
The Reddit eFoil Community
Reddit isn’t always the most wholesome place, but it has many users who are willing to help with recommendations and guidance. The eFoil subreddit is a great place to see what equipment others are using and read about their experiences.
Board And Hydrofoil Building Facebook Group
Facebook isn’t known for its flexibility, but it has many active users, which makes this Facebook group a great place to ask questions.
Electric Hydrofoil Facebook Group
This Facebook community lets users make recommendations, ask questions, and even sell components and hydrofoils.
How Much Does It Cost To Build Your Own E Foil?
Building an E Foil can vary in cost depending on your chosen components and materials. Here’s an estimated breakdown of the typical costs involved:
- Surfboard blank or foam core: $100-$300
- Fiberglass cloth and epoxy resin: $50-$100
- Hydrofoil components: $500-$2,000
- Electric motor kit: $1,000-$3,000
- Batteries: $500-$1,500
- Controller and wiring: $100-$300
- Miscellaneous materials and tools: $200-$500
Overall, the total cost of building an E Foil can range from $2,500 to $7,000 or more. However, prices will vary based on the quality of components, customization options, and where you source your materials.
To save money on your DIY project, consider the following tips:
- Compare prices from various manufacturers and suppliers to find the best deals.
- Look for used or discounted hydrofoil components and electric motor kits in online marketplaces or forums.
- Opt for a more budget-friendly surfboard blank or foam core that still meets your needs.
- Consider DIY alternatives for specific components, such as building your own motor (if you have the knowledge and expertise).
- Be resourceful and repurpose materials when possible.
Remember, while saving money is essential, it’s also crucial to prioritize quality and safety when selecting components for your E Foil. Don’t sacrifice your safety to save a few dollars.
Can You Build Your Own Electric Surfboard Without A Kit?
As we’ve seen, it is possible to build a custom electric surfboard from scratch without using a kit. This approach allows for more creativity and customization but requires more technical knowledge and expertise. Here are the key steps involved:
- Design and planning: Create a detailed design for your custom electric surfboard, including dimensions, shape, and features.
- Source components: Research and select individual components, such as the hydrofoil, motor, batteries, and controller, that fit perfectly with your design and performance requirements.
- Manufacturing: Shape the board using a foam blank or build a custom mold, then apply fiberglass and epoxy resin to reinforce the board.
- Assembly: Install the hydrofoil components according to your design, ensuring proper alignment and attachment. Integrate the electric motor, batteries, and controller into the board, following industry standards and safety guidelines.
- Testing and adjustments: Thoroughly test the custom electric surfboard in controlled conditions to ensure stability, performance, and safety. Make any necessary adjustments to optimize it.
Building a custom electric surfboard from scratch requires advanced skills and knowledge, but it can be a fun project to take on. It’s wise to consult with experts and seek professional guidance to ensure you do it right.
How To Ride Your E Foil
Once you have built your E Foil, it’s time to hit the water and test your handiwork! Here’s some advice to help you master your electric hydrofoil surfboard:
- Start in calm waters until you get accustomed to the feeling of riding an E Foil.
- Find your balance. This requires slight adjustments and weight distribution. Keep your feet centered and maintain a relaxed and stable posture.
- Start at a lower speed. Then, gradually increase it as you gain confidence and stability. Sudden acceleration can be challenging to control, especially for beginners.
- Make small and subtle movements with your body to control the pitch and roll of the board. Avoid making sudden or jerky movements, as they can affect your balance.
- Experiment with gentle turns by shifting your weight and leaning in the desired direction. Start with wider turns that require less control to execute, then gradually work your way up to sharper turns.
- Stay aware of your surroundings. Always be mindful of other swimmers, surfers, and obstacles in the water. Maintain a safe distance and always prioritize safety and respect for others.
- Enjoy the ride! E Foiling offers a unique and thrilling experience. Embrace the sensation of flying above the water and savor the freedom and excitement it brings.
Conclusion
Building your own DIY E Foil is a challenging but rewarding endeavor that allows you to experience the excitement of electric hydrofoil surfing. By following this step-by-step guide, sourcing suitable materials, and tapping into online communities for support, you can create a custom electric surfboard that suits your preferences and riding style for countless hours of fun on the water!

Luke Morris is an avid athlete and the driving force behind Surfhungry, a vibrant online platform dedicated to sharing the joy and passion of surfing and water sports with enthusiasts around the world. With a deep-rooted love for the ocean and a lifelong commitment to riding waves, Luke’s journey as a surfer has inspired him to create a community where like-minded individuals can come together to celebrate their shared passion.


