Surfing tricks are some of the most exciting maneuvers you can perform on a wave to add variety to your surf! They require technical skill, balance, and athleticism and range from simple maneuvers like carving and bottom turns to more advanced tricks like aerials and barrel rides. They open new opportunities that level up your surf to the next exciting level, and it starts with how to perform them!
You can take your surf to the next level by learning how to do a carve, bottom turn, cutback, floater, and aerial maneuvers like the backflip, 540 & 720, and barrel riding. They make it easier to navigate the waves, add a thrill to your surf, and are essential for pro surfers to impress the judges.
When we first learned the joy of running, it unlocked a new world of opportunities for us. The same principle applies to surfing; knowing how to carve is handy for quickly changing direction, while the bottom turn is the key that makes all the other tricks accessible to you. Let’s look at each maneuver and discuss what they look like, how to do them, common mistakes, and tips to improve them!
Table of Contents
Carving
Carving is one of the most essential and exciting maneuvers in surfing. It gives you the power to change direction quickly and drastically by using the power and speed of the wave. Carving also symbolizes style and skill, showing your ability to control your board and ride on the rails.
Carving on a surfboard requires executing a forceful 180-degree turn by progressively exerting pressure on the board with either your toes or heels.
Typically, you will need to carve your surfboard on a high-speed wave that offers broad, open sections ahead of you to maximize your surfing experience.
Keep in mind carving is different from trimming, which is a more subtle way of changing direction by shifting your weight slightly on the board. Trimming helps adjust your position on the wave and maintain speed, but carving is more radical and expressive.
How To: Mastering The Art Of Carving
Carving is a fundamental skill in surfing, and with practice, it can be an exciting way to ride the waves. Here are 12 steps to help you perfect your carving technique:
- Begin by catching a wave at shoulder height on the side, known as the shoulder.
- To gain momentum, initiate a well-executed bottom turn.
- Drive your surfboard from the bottom towards the crest of the wave.
- Put pressure on your heel side (frontside) or toe side (backside) without rotating your shoulders.
- Sink the rail of the surfboard into the wave face.
- Apply pressure on your legs and look over your shoulder.
- Place your leading hand into the water.
- Boost the rotation of your shoulder axis by putting more pressure on your toes or heels.
- Lengthen your front leg to increase the power in your back foot.
- When the nose of the surfboard has completed the turn, release the rail before encountering the whitewater.
- Flatten out the board and examine the base of the wave.
- Resume riding with a bottom turn.

Tips And Common Mistakes To Consider When Carving
- Practice carving on both sides (frontside and backside) to develop your balance and coordination.
- Start with smaller waves and work your way up to bigger ones as you gain confidence and experience.
- Bend your knees and maintain a low body posture to increase stability and leverage.
- Use your arms and head to guide your turns and maintain balance.
- Don’t lean too much on the back foot, or you’ll lose speed and stall.
- Don’t overextend your front leg, or you’ll lose control and fall off.
- Don’t shy away from digging deep into the wave and carving hard; it’s better to fall than to play it safe.
Bottom Turn
The initial turn performed after catching a wave is known as the bottom turn. It’s one of the most critical maneuvers in surfing because it sets up every other move you want to do on the face.
A bottom turn involves turning your surfboard at the bottom of the wave, using your rail and your fins to carve an arc on the water. The bottom turn can be either minor or major, depending on how tight and vertical you want to go.
A minor bottom turn is used to sweep yourself diagonally to the wave’s face, where you can do maneuvers like top turns, cutbacks, and roundhouses. A minor bottom turn is commonly used on waves with softer shoulders or when you want to maintain speed and flow.
A major bottom turn is used to launch yourself vertically to the wave’s lip, where you can do maneuvers like snaps, off-the-lips, airs, and barrels. A major bottom turn is generally used on waves with steeper sections or when you want to attack the wave with power and aggression.
Perfecting Your Bottom Turn: 6 Easy Steps
The bottom turn is a handy maneuver in surfing that helps you generate speed and set up for more advanced maneuvers. Following these six steps, you can perfect your surfing technique and propel you to the next level.
- Take off as steep and late as possible to gain maximum speed.
- Time your bottom turn: delay it as long as possible without losing speed.
- Keep a low stance: bend your knees to keep your balance.
- Keep your feet centered over the stringer: your weight must be evenly distributed.
- Steadily apply pressure on your toes (frontside) or heels (backside), and let the surfboard’s rail find the water’s surface.
- Once you’ve started climbing up the wave face, pump for speed, stall for tubes, kick out, or prepare for another maneuver.
Bottom Turning Like a Pro: Common Mistakes To Avoid
- on’t go too low off the bottom of a wave, or you’ll lose most of your speed.
- Avoid racing too far out in front of the section and overlooking your bottom turn marker, making you miss the wave’s best part.
- If you don’t compress through the bottom turn (or compress too late), it will prevent you from engaging the rail and generating power.
- Leaning too much on the back foot or overextending the front leg, which will cause you to lose speed and stall or fall off

Cutback
The cutback is a classic surfing maneuver that redirects the board toward the breaking wave. It allows you to stay in the most potent part of the wave and maintain speed and flow. The cutback is also stylish and expressive, showcasing your control and finesse.
It involves turning your board on the rail from the shoulder of the wave back to the curl or pocket of the wave. It demands that you shift your body weight from your front to your back foot and use your arms and shoulders to guide and pivot your board through an arc. The cutback can be either roundhouse or snap, depending on how tight and sharp you want to go.
A roundhouse cutback is a smooth and wide turn that takes you back to the whitewater, where you can rebound off it and continue riding. A roundhouse cutback is commonly used on waves with long walls or when you want to draw out your lines.
A snap cutback is a quick and sharp turn that takes you back to the pocket of the wave, where you can generate speed and set up for another maneuver. A snap cutback is generally used on waves with shorter sections or when you want to attack the wave with power and aggression.
From Setup to Finish: Six Steps for a Successful Cutback
- Build up speed – when you see the part of the wave where you would like to do your cutback, start building your speed by fluctuating your body back and forth. The momentum you generate will be handy to help you maintain balance.
- Start your turn – as you make your way to the shoulder of the wave, and you notice that you’re slowing down, start performing your cutback. Manage your momentum by sliding your weight onto your back foot and onto the tail of your surfboard. The motion will cause your board to pivot back and head toward the part of the wave that’s breaking.
- Let your eyes direct your body – direct your surfboard with your eyes and head, similar to how you do on a motorcycle. In this case, you want to back to where the wave is breaking. After some practice, you’ll start to notice your body naturally follows the trajectory of your eyes, which will benefit you when you make the turn.
- Make use of your shoulders & arms – your torso is an important mechanism for ensuring your cutback goes well. Navigate the turn with your arms and shoulders, carefully using your balance to steer your board to make the cutback. Face your arms and shoulders toward the turn to start and complete the cutback.
- Have a steady balance – centering your balance is the key to a smooth cutback. Maintain a low body position on your surfboard with stretched arms and bent knees. Be careful when you lean too far in one direction because the momentum can cause you to wipe.
- Cutback to break – when you’ve completed your cutback turn, you can make your way back to the breaking part of the wave.
Cutback Techniques: 3 Tips to Improve Your Style And Execution
- You need to generate enough speed before the maneuver, or your cutback might look sluggish and unimpressive.
- If you don’t set up for the turn properly, you’ll lose momentum and have a higher chance of wiping.
- Turning too early or too late will cause you to lose speed or miss the opportunity to hit the lip of the wave.
- Drop your arm below your hip when turning, which helps to maintain your balance.
- Avoid standing too tall during the turn; you want to be low and compressed.
- Make sure you rebound back to the foam after your cutback.

Floater
Floater: Overview of the floater, a more advanced surfing trick that involves riding up and over a section of the wave instead of around it.
A floater involves gliding horizontally over the wave’s lip or foamy section about to break. You accomplish this by speeding up and going over the top of a breaking part of the wave rather than around it, after which you re-enter the wave by dropping back down to the face. The floater can be either frontside or backside, depending on which way the surfer is facing.
A frontside floater is when you face the wave while doing the maneuver, while a backside floater is when you have your back to the wave while doing the maneuver.
Surfing on the Edge: Perfecting Your Floater Technique
To do a floater, you need to follow these seven steps:
- Generate enough speed on the shoulder and look for a section that is about to break.
- Perform a shallow bottom turn with a slight angle towards the breaking part of the wave.
- Shift your weight on the back foot as you get close to the lip. This will allow you to lift your nose up and over the white water.
- Throw your hands up and forward in the air as to unweight the front part of your surfboard.
- Stay low and compressed on top of the white water, and keep your chest forward for more speed.
- Turn your shoulders, head, and chest towards the beach to go back downThis will point your board back down the wave.
- Compress your lower body to absorb the shock when you land near the bottom of the wave.
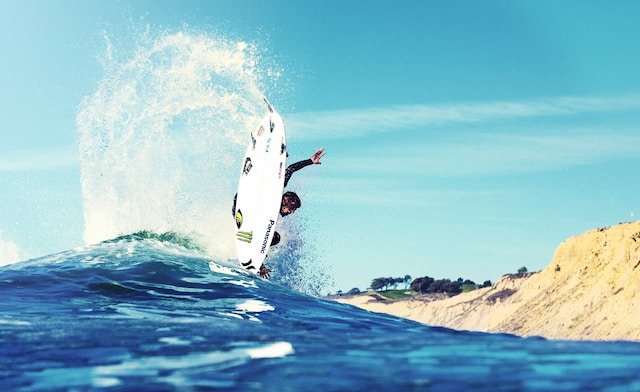
Aerial
An aerial maneuver is a stylish move that requires you to gain speed, find a ramp, launch off the lip, fly above the wave, and land on the face of the wave or on the flat. There are different types of aerial maneuvers, depending on your direction and rotation in the air. Some of the most impressive ones are:
- Air/Aerial – a basic aerial move where the surfer flies straight over the wave without any rotation.
- Air 360 – an aerial move where you complete a full rotation in the air and lands facing forward.
- Air Reverse – you rotate 180 degrees in the air and land facing backward.
- Backflip – requires you to flip backward in the air and land facing forward.
- 540 – an intermediate move where you rotate 540 degrees (one and a half rotations) in the air and land facing forward.
- 720 – an advanced move where you rotate 720 degrees (two full rotations) in the air and land facing forward.
- Alley-Oop – an aerial move where the surfer rotates backward in the air and lands facing forward.
- Superman – an aerial move where you extend your legs and arms in the air like Superman and grab your board before landing.
Pushing Your Limits: Progressing Your Backflip, 540, & 720
The Backflip, 540, and 720 aerial maneuvers are especially hard to do, and they require a lot of practice, skill, and courage. They are also very risky, as you can injure yourself or damage your board if you land wrong. But if you manage to pull them off, they are very rewarding and impressive. Good luck!
- Backflip – you need to find a steep ramp, launch off the lip with a lot of speed and projection, grab your board with both hands, tuck your knees and head in, and rotate backward. You need to spot your landing, release your board, and land on the flats or the face of the wave.
- Aerial Maneuver 540 – search for a vertical section of the wave and launch off the lip with speed and height. Grab your board with one hand, spin your body and board in the same direction, and keep your eyes on the wave. You need to release your board, complete the rotation, and land on the flats or the face of the wave.
- Aerial Maneuver 720 – locate a large ramp and gain considerable speed and altitude as you launch off the lip. Then, grab your board with one hand, rotate both your body and board in the same direction, and stay focused on the wave. Finally, release your board, complete two full rotations, and aim to land on either the flats or the face of the wave.
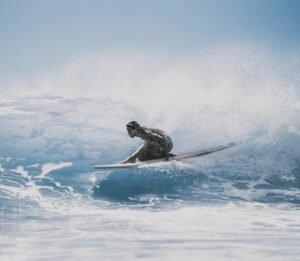
Barrel Riding
Getting barreled is one of the most thrilling and rewarding experiences in surfing! It involves riding inside the hollow part of a breaking wave, surrounded by a wall of water.
Getting barreled requires skill, timing, and courage, but the wave’s size and shape also matter. Some waves are more likely to form barrels than others, and some spots are known for their consistent barrels. Follow these handy tips to get more easily barreled:
Make Sure You Have The Righ Surfboard
It’s easier to drop into barreling waves on a shortboard than on a longboard. A rounded tail will provide more drive and stability. You can use a bigger board if the waves are taller than six feet.
Practice On The Right Waves
You don’t need to surf overhead waves to get barreled. You can practice on waist- or chest-high waves with steep shoulders. Getting into a barreling wave on your backhand is usually easier, as you can lower your body and crouch through the tube.
Get In Position
Before you paddle out, analyze how the waves break and where the barrel opens. Then, paddle to that spot and visualize your take-off. You want to drop in quickly and at a tight angle to get ahead of the lip and into the barrel.
Stall & Pump
Once inside the barrel, you need to adjust your speed to stay within the tube. To slow down, you can drag your hand or foot on the face of the wave or lean back slightly. You can pump your board by shifting your weight from your toes to your ankles to speed up.
Stay Centered
You want to avoid touching the top or bottom of the barrel, as that can make you lose balance or speed. Stay in the middle of the tube and keep your body low and compact. Focus on the end of the barrel, ensuring that it remains the same size as you pass through it.
Exit Strategy
It’s usually best to exit the barrel before it closes off. You can do that by angling your board towards the shoulder of the wave and accelerating out of the tube.
If the barrel closes on you, you can try to bail out by pushing your board forward and diving back or sideways through the wave. Always cover your head to protect yourself from your board or the lip.
Conclusion
Mastering the fundamentals like carving, bottom turns, and cutbacks are vital to improving your surfing to the next level. With practice, dedication, and a willingness to make mistakes, you can develop the necessary balance, coordination, and technique to carve up the waves like a pro. So grab your board, hit the beach, and perfect your skills today!
Luke Morris is an avid athlete and the driving force behind Surfhungry, a vibrant online platform dedicated to sharing the joy and passion of surfing and water sports with enthusiasts around the world. With a deep-rooted love for the ocean and a lifelong commitment to riding waves, Luke’s journey as a surfer has inspired him to create a community where like-minded individuals can come together to celebrate their shared passion.